Goals
Upon successful completion of this lab, you should also be able to trace and write programs using:
- The
__str__and__lt__methods - Lists of objects
Setup and Practice
Setup
- If your lab machine was not started in MacOS when you went to use it, reboot it to MacOS.
- Follow these procedures to mount your blue home-directory on the local machine and create a PyCharm project (call it Lab12). You will use PyCharm in the next part, but, it is important that you set up your project now so that if you run into any issue, we can resolve them quickly.
- Right-click or control-click to download these 2 files and place them into the directory for this lab: Take a look at the contents of these files, but do not make any changes to them.
Practice: Review and Summary
Object-oriented programming is all about defining our own data types and the operations they support; however, there are some draw-backs to inventing new types. Consider the code:
print(5)Python knows exactly how to print an integer like 5. More precisely, it knows how to internally convert that integer into its string representation, and then print the string. However, if you were to write something like:
s = Student('Sally Sonoma', [90, 100, 95])  # using Student class from Lab 12
print(s)
How is Python supposed to know how you would like this printed? How does it know how to print a Student? Well, it doesn't. It does not know anything about the Student datatype beyond what you've provided in the class definition.
In Part B of Lab 12, we side-stepped this problem by defining a special method for the class, so we could do s.print() to get the Student instance printed in exactly the format we desired. In this lab, we will solve this problem differently: we will define a different, special method for our class which will cooperate better with Python's built-in print function and other functions that manipulate strings. Thus, when we are done, it will be possible to print(s) with Student instance s.
Printing isn't the only problem! Again, with Python's built-in datatypes, the Python interpreter knows exactly what to do with something like:
if 100 > 87:or
if 'Los Angeles' < 'San Diego':
Specifically, it knows how to compare integers and strings. But, what if you tried to compare two Student objects? The interpreter will throw up its hands: how is it supposed to know what makes one student "less than" another?
In this lab, we'll define a special method that tells the interpreter how the < operator should behave when comparing two instances of our class. There are similar methods for other operators, but we won't cover those in this lab (the idea is the same for those, though).
Part A: Define City class
In this part of the lab, you will implement a City class. Objects of this class
have instance variables for the city's name (a string) and population (an integer). You will implement the following methods:
__init__: initialize a newCityobject__str__: produce a readable text representation of aCityobject__lt__: define what it means for oneCityobject to be less than another
Instructions
Enter the following code as lab12a.py:
""" Program: Lab 12 Author: Your name Description: Define and test a basic City class. """ import sys class City: pass def main(): tokyo = City('Tokyo', 13189000) mexico_city = City('Mexico City', 8857188) main()- Your first task will be to define an
__init__method for theCityclass that saves the city name and population into the newCityobject. First, answer Question 1 in your writeup. - Replace the
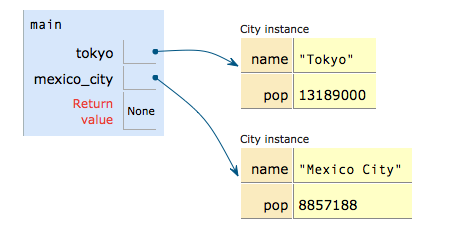
passin the implementation ofCitywith the definition of an__init__method that saves the city name and population into the newly created object. Copy your code into the the online Python 3 tutor and visualize it. Click Last and then hit Back once. You should see something like this at the bottom right:
Returning to PyCharm, add the following lines of code to your program at the end of the definition of
main:print(tokyo) print(mexico_city)
Run your program. You should see an output that looks something like:
<__main__.City object at 0xe5ec10>
<__main__.City object at 0xe5ecd0>
This is because we haven't told Python how to represent a city as a string.- When these
printstatements are executed, they will automatically call the__str__method of ourCityclass --- if one is defined --- to get a string representation of theCityobject. Our next goal is to define a__str__method. Answer Question 2 in your writeup. Inside
class City, add a definition of the__str__method and implement it. Its goal should be to return a string with the city's name and population formatted like this:Tokyo (pop. 13189000)
orMexico City (pop. 8857188)
Rerun your program. If your implementation is correct, its behavior should match the two outputs above.Add the following lines of code to the end of
main():# Print whichever city is larger print('The larger city is:') if mexico_city < tokyo: print(tokyo) else: print(mexico_city)Run your program. It should fail because we haven't told Python what it means for oneCityobject to be smaller than another.Inside
class City, add the following method definition:def __lt__(self, other): '''Returns True if the population of 'self' is less than the population of 'other', and returns False otherwise. ''' pass- Replace
passwith code that compares the populations ofselfandother. This code should returnTrueifselfhas a lower population thanother, andFalseotherwise. Run your code one more time. You should see the following output:
Tokyo (pop. 13189000)
Mexico City (pop. 8857188)
The larger city is:
Tokyo (pop. 13189000)
- Continue to Part B.
Part B: Sort City objects
In this part of the lab, we will reimplement the sorting lab to use objects of your new City class
instead of just strings.
Instructions
- Make a new copy of your lab12a.py file, and name it lab12b.py.
- Add this definition of the
print_listfunction to your code:def print_list(list_to_print): '''Prints the contents of a list. Args: list_to_print (list): A list. ''' for i, item in enumerate(list_to_print): print(i, ': ', item, sep="") At the bottom of the definition of
main, add the following code:testlist = [tokyo, mexico_city]
Then add one more line that calls the
print_listfunction to printtestlist. Comment out all of the otherprintstatements, and run your program. You should see:0: Tokyo (pop. 13189000) 1: Mexico City (pop. 8857188)
- Copy the
selection_sortandfind_index_of_minfunction definitions from your prior Lab 10 code. At the end of
main, callselection_sorton your list, and then callprint_listto print it again. Comment out the lines (inselection_sort) that print which elements were swapped. After adding some blank lines and additional print statements, you should see the following output:The original list of cities is: 0: Tokyo (pop. 13189000) 1: Mexico City (pop. 8857188) The new list of cities is: 0: Mexico City (pop. 8857188) 1: Tokyo (pop. 13189000)
- Answer Question 3 in your writeup.
- The next challenge is to read a list of cities from a file. Copy the definition of
readfilefrom a previous lab. Use a version that returns a list of strings, where each string is one line of the input file. - Comment out all of the code within
main. - Add new code in
mainthat asks the user for the name of an input file and callsreadfileto read its contents into a list. - Call
print_liston this list, and answer Question 4 in your writeup. Inside
main, and before the call toprint_list, you will insert code to create a list ofCityobjects based on the lines of the input file. First, create a new, empty list for your list of cities.- Next, you will loop to populate your new list of cities. Answer Question 5 in your writeup.
It is possible to write a loop that increments the loop counter by 2 instead of 1 each time you go through the loop. Type the following code into the the online Python 3 tutor:
for i in range(0, 5, 2): print(i)- Write a loop that will go over the lines of text read from the input file, incrementing i by 2 instead of 1.
- Within that loop, create a new
Cityobject each iteration. Element i of your list is the name of the city, and element i + 1 is its population. Don't forget to convert the population to an integer. - Append the
Cityobject you created to the list of cities. Modify the call to
print_listso that it prints your list of cities, not the list of lines in the input file. Sample output:Name of input file: cities-small-pop.txt 0: Santa Rosa (pop. 167815) 1: Petaluma (pop. 57941) 2: Rohnert Park (pop. 40971) 3: Windsor (pop. 26801) 4: Healdsburg (pop. 11254)
- Add code to selection-sort the list of cities and print the old and new lists.
Sample output:
Name of input file: cities-small-pop.txt

The original list of cities is:
0: Santa Rosa (pop. 167815)
1: Petaluma (pop. 57941)
2: Rohnert Park (pop. 40971)
3: Windsor (pop. 26801)
4: Healdsburg (pop. 11254)

The new list of cities is:
0: Healdsburg (pop. 11254)
1: Windsor (pop. 26801)
2: Rohnert Park (pop. 40971)
3: Petaluma (pop. 57941)
4: Santa Rosa (pop. 167815)
- Demo. When your code matches the sample output, call an instructor to demo it.
- Continue to the next part to submit your program.
Assignment Submission
Instructions
- Answer the last question (#6) in your Moodle writeup. Review your answers, and then click the "Next" button at the bottom of the quiz. Once you do that, you should see a "Summary of Attempt" screen.
- Click the "Submit all and finish" button.
Warning: You must hit "Submit all and finish" so that your writeup can be graded! It is not submitted until you do this.
Once you have submitted your quiz, you should see something similar to this at the top of your Moodle window. The important part is that the State shows up as Finished.
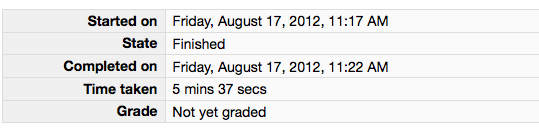
Please leave this tab open in your browser. - Click on the "Lab 12 code" link in Moodle and open in a new tab. Follow the instructions to upload your source code (lab12b.py) for Lab12. You could either browse for your code or, using a finder window, drag and drop your lab12b.py from your cs115/Lab12 folder to Moodle. You should subsequently see a dialog box which indicates 'Submission Status' as 'Submitted for grading'. Leave this tab open in your browser.
- With these confirmation pages open in your browser, you may call an instructor over to verify that you have completed every part of the lab. Otherwise, you are done!