Goals
Upon successful completion of this lab, you should be able to write and modify Python program that use:
- definite loops
- ranges
- the accumulator pattern
Setup and Practice
Setup
- If your lab machine was not started in MacOS when you went to use it, get help to reboot it to MacOS.
- Follow these procedures to mount your blue home-directory on the local machine and create a PyCharm project (call it Lab02). You will use PyCharm in the next part, but, it is important that you set up your project now so that if you run into any issue, we can resolve them quickly.
- Install the graphics.py library to use it during this lab. See these procedures for assistance.
Practice
- Answer Question 1–5 in your writeup (on Moodle).
- In a new browser tab, visit
the online Python 3 tutor
and enter the following Python code:
for i in range(3):
    print('Cupcakes!')
Then click "Visualize execution." - Click the "Forward" button to step through the code, instruction by instruction. Pay attention to how the variable
ichanges (shown on the right side of that screen). Using the visualizer to help you, answer Questions 6 and 7 in your writeup. Pay attention to both the program output (below your code) and the global variables (to the right).
Hint: Your answer to Question 7 should be a comma-separated list with spaces between the values. For example:
8, 9, 10- Now click "Edit code" in the Python visualizer and enter the following code:
for j in range(2, 8):
    print('Marshmallows!')
Visualize this code and answer Questions 8 and 9 in your writeup. - Now try...
for k in range(8, 2):
    print('Thin Mints (TM)!')
Visualize this program and answer Questions 10 and 11 in your writeup. - Now try...
x = 5
for i in range(1, 6):
    x = i
Visualize this program and answer Question 12 in your writeup. - Now try...
x = 5
for i in range(1, 6):
    x = x + i
Visualize this program and answer Question 13 in your writeup. - Continue to Part A.
Part A: Sum a list of numbers
The instructions below will help you write a program that asks the user for 5 numbers and computes their sum and mean.
Instructions
- Open PyCharm and then the project Lab02. Create a new python file an call it lab02a.py. Copy-paste the following program into the new window, substituting your name for the italicized text:
""" Program: CS 115 Lab 2a Author: Your name Description: This program adds up the numbers from 1 to 5. """ def main(): total = 0 for i in range(1, 6): total = total + i print('The total is:', total) main() - Answer Questions 14–16 in your writeup. You can use the the online Python 3 tutor to answer these questions.
- If you modified your program to answer the questions in your writeup, change it back to the original version.
- Over the next few steps, you will modify your program to ask the user for 5 integers and then print
their sum. Here is an example of what your program will eventually do:
Enter an integer: 2
Enter an integer: 100
Enter an integer: -1
Enter an integer: 80
Enter an integer: 4000
The total is: 4181
The mean is: 836.2
If you feel ready to write this program, try it! If you get it working, skip to Step 9. Otherwise, work through the following steps. - Modify your original program to prompt for an integer and read the user's input into a new variable. Put this
new statement inside the loop so that it happens 5 times.
After you do this step only, you will be asking the user for 5 integers, but your program will still print the sum as 15:Enter an integer: 2 Enter an integer: 100 Enter an integer: -1 Enter an integer: 80 Enter an integer: 4000 The total is: 15
- Now, change the code so that every time you go through the loop, instead of adding
ito the running total, you add the number that the user just typed. - Verify that your program's output matches this example:
Enter an integer: 2
Enter an integer: 100
Enter an integer: -1
Enter an integer: 80
Enter an integer: 4000
The total is: 4181
- Compute the mean by dividing the total by 5. You should only need to do
one division operation. Verify that your program's output matches this example:
Enter an integer: 2
Enter an integer: 100
Enter an integer: -1
Enter an integer: 80
Enter an integer: 4000
The total is: 4181
The mean is: 836.2
- Demo. Call an instructor over to demonstrate your Part A code.
- Continue to Part B.
Part B: Draw arbitrary circles
For this part of the lab, you will use the graphics package to initially draw a bunch of circles. Later in the lab, we will use loops to automatically generate multiple circles.
Instructions
- In PyCharm, create a new Python file lab02b.py. Copy-paste the following program into the new window, substituting your name for the italicized text:
""" Program: CS 115 Lab 2b Author: Your name Description: Using the graphics package, this program will draw a circle. """ from graphics import * def main(): window = GraphWin("Circles", 800, 800) center = Point(100, 200) # create a point to serve as the center of the circle radius = 40 circle = Circle(center, radius) # create a circle centered at "center" with radius "radius" circle.setOutline('blue') circle.draw(window) # draw the circle in the window that we created earlier window.getMouse() # wait for the mouse to be clicked in the window window.close() # close the window after the mouse is clicked in the window main() - Run the program. You should see a circle with a blue outline and a radius of 40 pixels, centered at the point (100, 200). If you run into any trouble with the graphics package, please call a lab instructor.
Lets read and try to understand this code, using the below notes.
The statement
window = GraphWin("Circles", 800, 800)creates a window object, stored inside the variable
window. The window's title is Circles. Its width and height are each 800 pixels (the first number is the width and the second one is the height).To create a circle, we need to first create a Point object that acts as its center. The variable
centerholds this Point object. Notice that the data types of graphics objects begin with upper-case letters, and we are using lowercase letters for the names of variables that hold these objects.We also made the radius a variable, so that we can easily change it later if necessary.
Now, our code is:
center = Point(100, 200)
radius = 40
circle = Circle(center, radius)  # create a circle centered at "center" with radius "radius"
and we could simply this, by re-writing as the equivalent code:
circle = Circle(Point(100, 200), 40) # create a circle centered at (100, 200) with radius 40
For now, either option is fine.
After we create and configure our circle, we use the following statement to draw it into the window that we created earlier:
circle.draw(window) # draw the circle in the "window" that we created earlier
Without that statement, the circle will not appear in the window.
Before our program finishes, we need to close the window that we have created. We use the following statement for that purpose.
window.close() # close the window after the mouse is clicked in the window.
However, if we put this right after the
circle.draw(win), our program will draw the circle and then immediately close the window, before you get a chance to see what has been drawn in it. To prevent that, we add the following statement:window.getMouse() # wait for the mouse to be clicked in the window window.close() # close the window after the mouse is clicked in the window
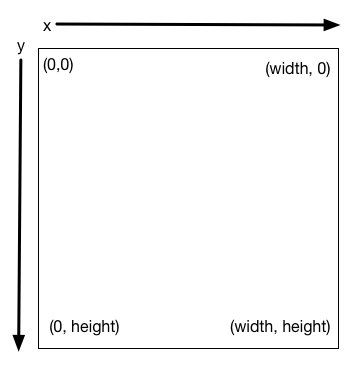
The statementwindow.getMouse()forces the program to wait for the user to click the mouse in the window before it proceeds. With this statement, we can make sure that the objects that we intended to draw appear in the window before it closes.Answer Question 17 in Moodle. Remember that the graphics coordinates work like this:
- Once you are comfortable with these concepts, add a few more circles to this program. Give them different radii and colors, and place them in different points in the window. Pay particular attention to how the coordinates of the center affect the placement of the circles. This page has a list of colors you can use.
- Once you have drawn at least 5 circles, continue to Part C.
Part C: Draw a stack of circles
Instructions
- In PyCharm, create a new Python file lab02c.py. Copy-paste the following program into the new window, substituting your name for the italicized text:
""" Program: CS 115 Lab 2c Author: Your name Description: Using the graphics package, this program will draw a number of circles. """ from graphics import * def main(): window = GraphWin("Circles", 800, 800) # Circle 1 radius = 50 x = 100 y = 100 center = Point(x, y) circle = Circle(center, radius) circle.setOutline('blue') circle.draw(window) # Circle 2 radius = 50 x = 100 y = 100 center = Point(x, y) circle = Circle(center, radius) circle.setOutline('blue') circle.draw(window) # Circle 3 radius = 50 x = 100 y = 100 center = Point(x, y) circle = Circle(center, radius) circle.setOutline('blue') circle.draw(window) # Circle 4 radius = 50 x = 100 y = 100 center = Point(x, y) circle = Circle(center, radius) circle.setOutline('blue') circle.draw(window) # Circle 5 radius = 50 x = 100 y = 100 center = Point(x, y) circle = Circle(center, radius) circle.setOutline('blue') circle.draw(window) window.getMouse() # wait for the mouse to be clicked in the window. window.close() # close the window after the mouse is clicked in the window. main() - Run the program. You should see only one circle, since the 5 circles are drawn on top of each other. Click in the window to exit the program.
- Your eventual goal is to modify the circles until you get the following stack:
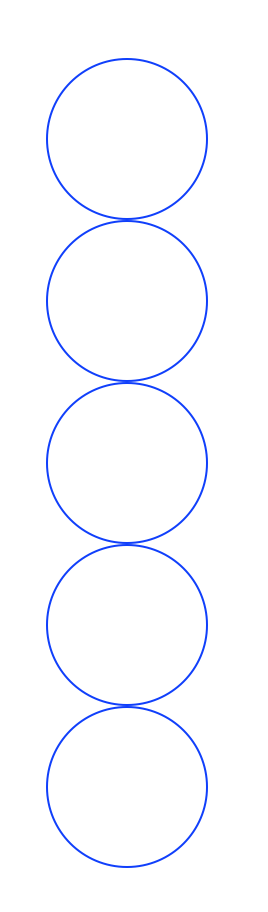
If you think you know how, answer Question 18 in your writeup and give it a shot! You can skip to Part D once you have it. Otherwise, continue. - Modify the center of the second circle so that it is immediately below, and adjacent to, the first circle. Change its color to red so that you can tell which is which.
- Pay close attention to the new y-coordinate and how it relates to the y-coordinates and radii of the other circles. Answer Question 18 in your writeup.
- Once your answer to Question 18 is correct, change the remaining circles to draw the full stack.
- Once you have the stack of circles, continue to Part D.
Part D: Draw a stack of circles using a for-loop
In this part, you will start with a new program and use a for-loop to generate the same image as the one that you just finished.
Then, instead of always drawing 5 circles, you will ask the user for the number of circles to draw.
Instructions
- Copy and paste the following program
in the
online Python 3 tutor and run it.
x = 100 y = 100 num_circles = 5 radius = 50 for i in range(num_circles): print('x =', x, 'and y =', y) # TODO: change the value of y for the next circle and print it - Run this program, and answer Questions 19–21 in your Moodle writeup.
- Using what you learned in Questions 15–17, replace the TODO comment with an appropriate statement that modifies the value of
yso that your loop prints the y-coordinates you identified in Question 18. - Test your code in the Python tutor, and make sure that it prints the exact values from Question 18.
- In PyCharm, create a new Python file lab02d.py. Copy-paste the following program into the new window, substituting your name for the italicized text:
""" Program: CS 115 Lab 2 Part D Author: Your name Description: Using the graphics package, this program will draw a number of circles using a for-loop. """ from graphics import * def main(): window = GraphWin("Circles", 800, 800) x = 100 y = 100 num_circles = 5 radius = 50 for i in range(num_circles): print('x =', x, 'and y =', y) # TODO: copy and paste a code-segment that draws one circle # (from your previous program, lab02c.py) here. # TODO: copy the line that modifies the y-value for the next circle # (from the previous step) here window.getMouse() window.close() main() - Where indicated by the comment, add the line of code that you just wrote in the Python tutor.
- Run the program. Make sure that its output in the console (text) window is still the same as that of the Python Tutor. It will also pop up an empty graphics window.
Just above the line you added, replace the other comment with code to draw one circle, based on your code from Part C.
Hints:
- Don't copy the code that sets the radius or the x- and y-coordinates.
- The circles can all be the same color.
- You should be sure this code is indented inside the loop, so that it runs 5 times and draws 5 circles.
- Run your program and verify that it draws 5 stacked circles, just like in Part C.
- Replace the line
num_circles = 5
with a line that gets the value ofnum_circlesfrom the user. You can assume that the user will always enter a positive integer that is small enough to fit the circles on the screen. - Test your program, and verify that the stack of circles matches the number specified by the user.
- Replace the line
radius = 50
with a line that gets the value ofradiusfrom the user. You can assume that the user always enters a reasonable positive integer. - Modify your calculations so that the circles are stacked right on top of each other. You don't have to change the initial value of
y, but you do have to change the way it is adjusted inside the loop. - Test your code with several different numbers of circles and radii. This part of the lab isn't a graded demo, but you should feel free to get a member of the course staff to test it – you'll build on it in Part E.
- Once you're confident in your Part D code, continue to Part E.
Part E: Draw a square of circles
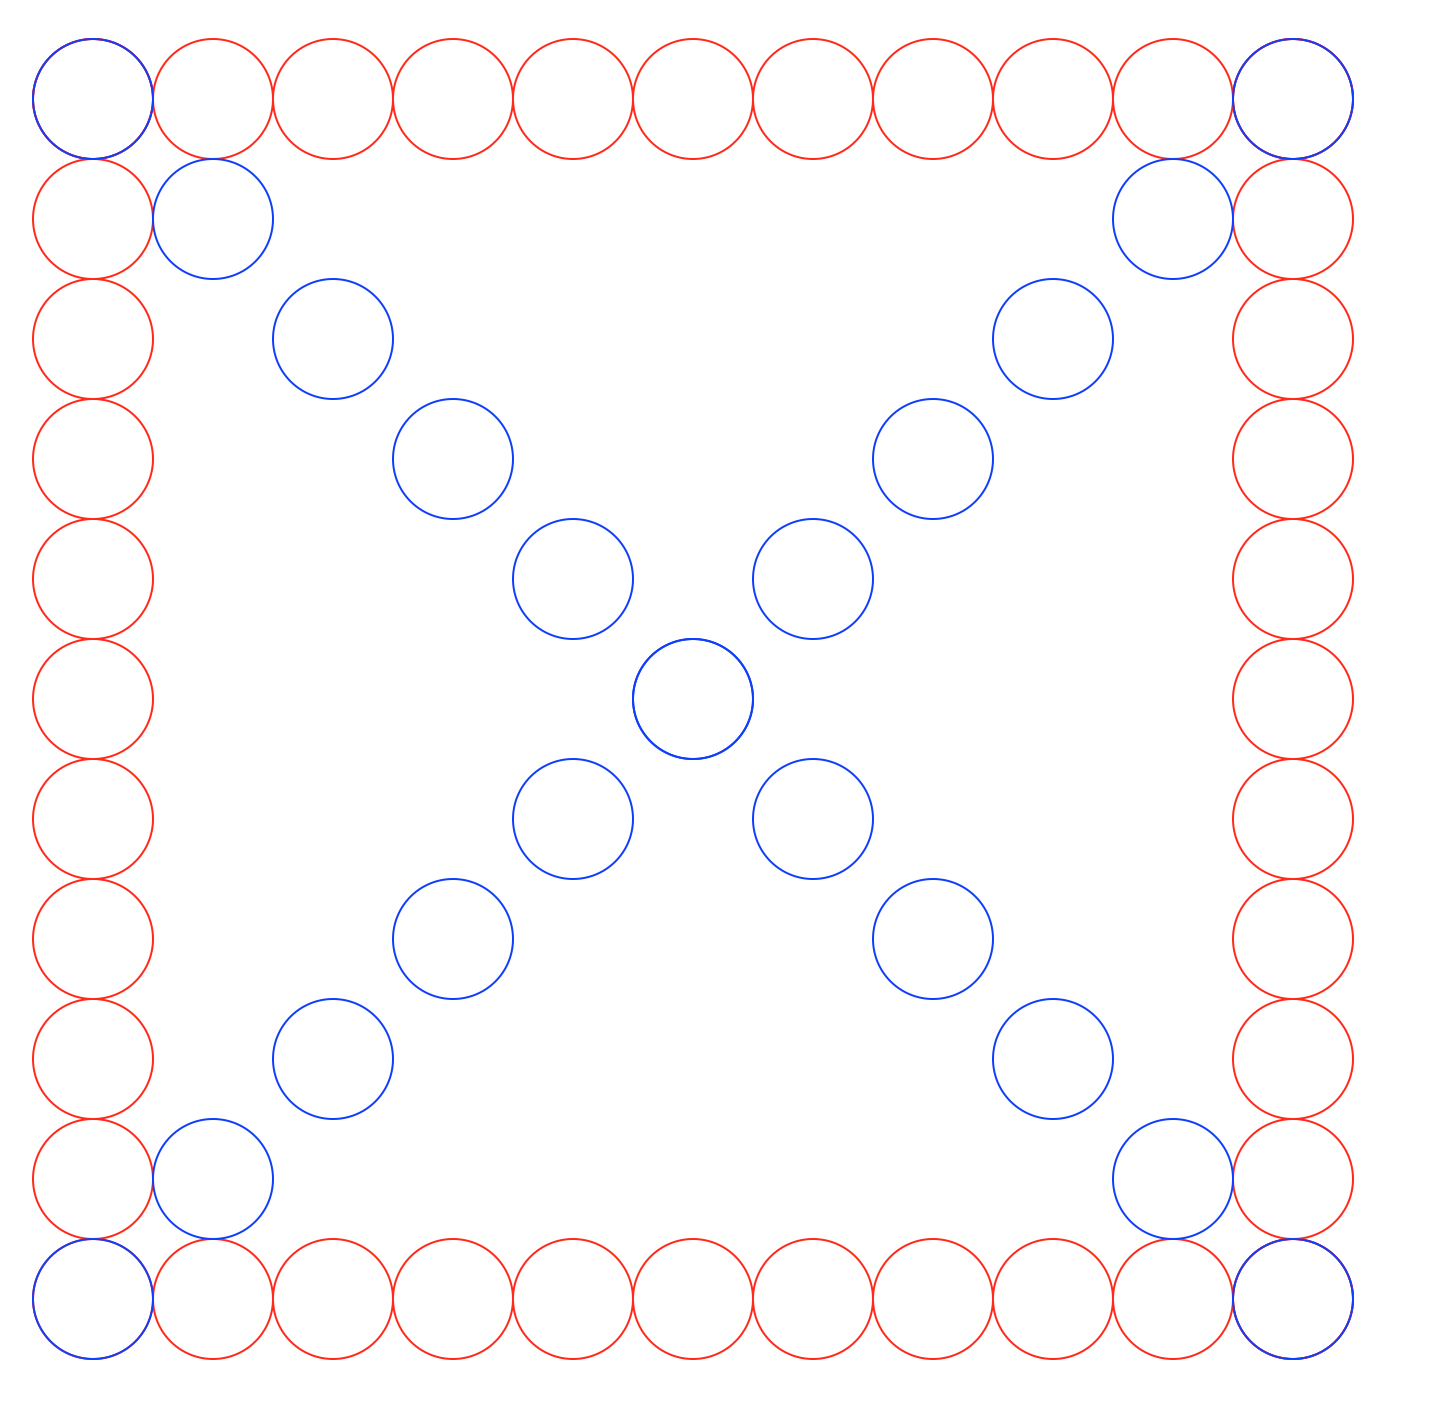
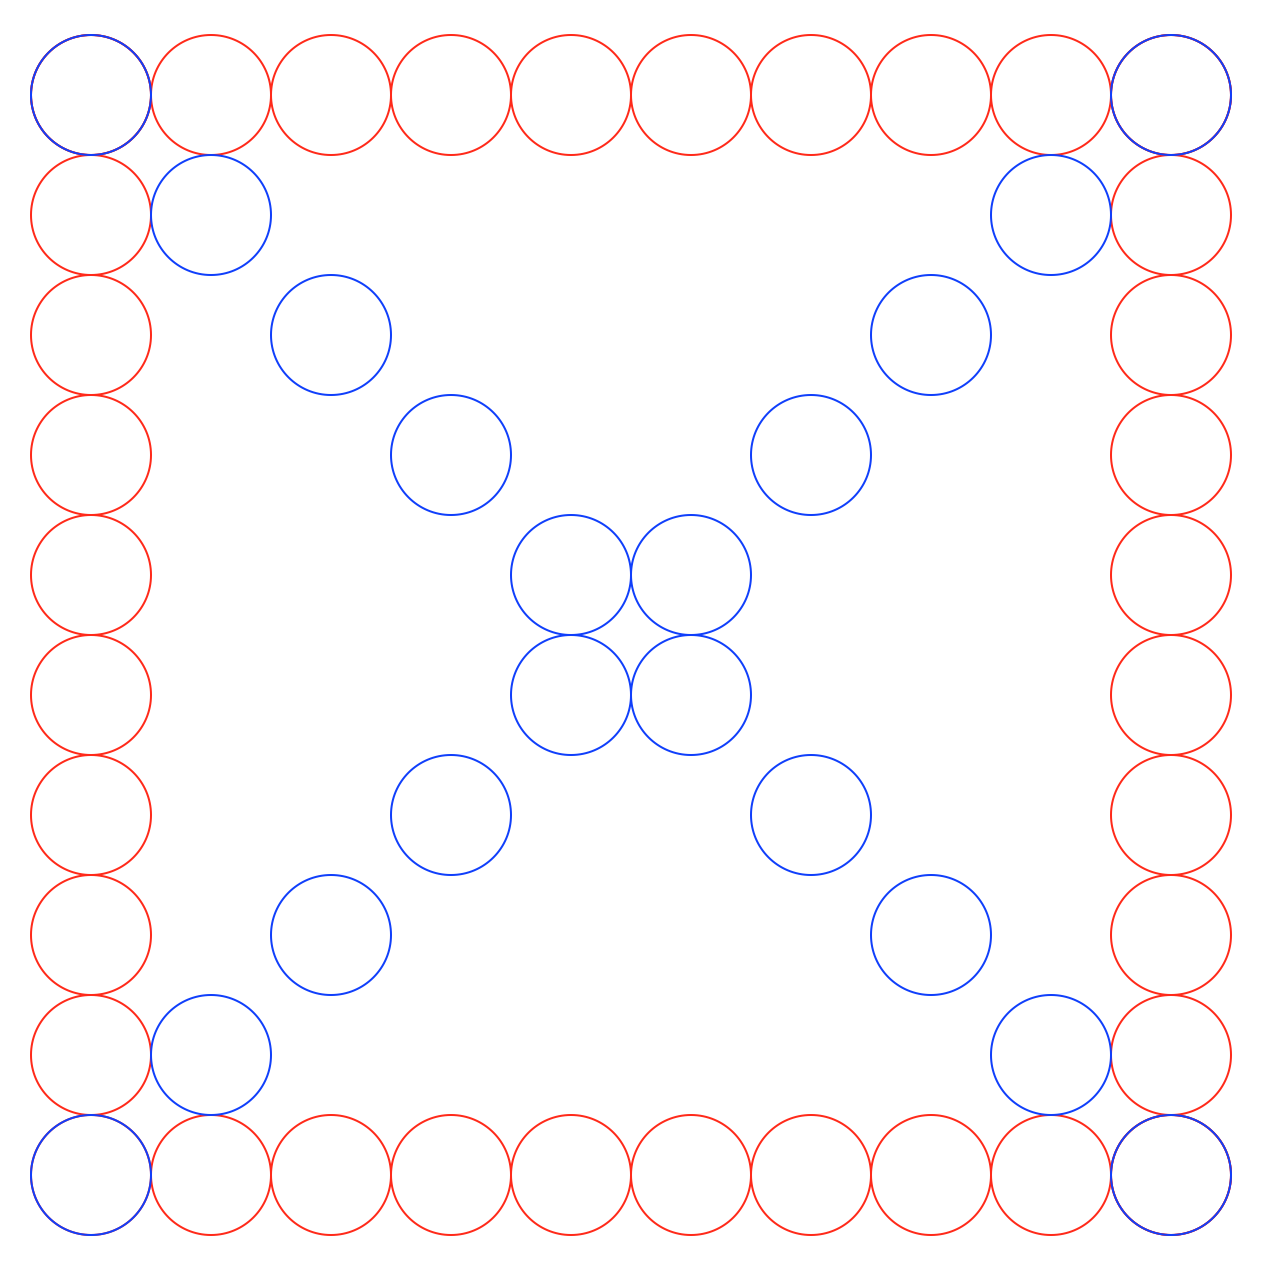
For the final part of the lab, you will write a Python program that accepts user input to generate images that are
similar to the one below. The user will specify the number of circles on each side of the square
shape and the radius of each circle. This image was generated for 11 circles and a radius of 50.
Instructions
- In PyCharm, create a new Python file lab02e.py:
""" Program: CS 115 Lab 2 Part E Author: Your name Description: Using the graphics package, this program will draw a square of circles. """ from graphics import * def main(): window = GraphWin("Circles", 800, 800) # TODO Step 1. # Get the number of circles and the radius from the user. # TODO Step 2. # Draw the left vertical circles. # Copy and paste what you need from your lab02d.py here. # TODO Step 3. # Draw the top horizontal circles. # Copy and paste the previous code-segment that draws vertical # circles (step 2 above) and make the necessary changes to it so # that it draws the top row of circles. # It is okay to draw a circle on the existing top circle. # Hint: To draw horizontal circles, think which # coordinate (x or y) needs to be changed inside the for-loop # TODO Step 4. # Draw the bottom horizontal circles. # Copy and paste the previous code-segment that draws the # top circles (step 3 above) and make the necessary changes # to it so that it draws the bottom row of circles. # It is okay to draw a circle on the existing bottom circle. # TODO Step 5. # Draw the right vertical circles. # Copy and paste the code-segment that draws the (left) vertically # stacked circles (step 2 above) and make the necessary changes # to it so that it draws the right vertical circles. # It is okay to redraw the right-most two horizontal circles. # TODO Step 6. # Draw the top-left-to-bottom-right diagonal circles. # Copy and paste the code-segment that draws the (left) vertical, # stacked circles (step 2 above) and make the necessary changes # to it so that it draws the circles that are the left-to-right # diagonal of the square. The change in successive x and y of # these circles is exactly the same as those in the successive # horizontal and vertical circles, respectively. # Hint: To draw diagonal circles, you would need to change both # the x and y-coordinate inside the for-loop # TODO Step 7. # Draw the top-right-to-bottom-left diagonal circles. # Copy and paste the code-segment that draws the left-to-right # diagonal circles (step 6 above) and make the necessary changes # to it so that it draws the circle on the right-to-left diagonal # of the square. # Hint: To draw these circles, think about if the successive x and # y-coordinates inside the for-loop need to increase or decrease. window.getMouse() window.close() main() - Save this program as lab02e.py.
- Directly after the TODO Step 1 comments, write the two lines you used to ask the user for the number of circles and the radii of the circles.
- Run the program, and make sure that it asks the user for the two values in the console (text) window. It will also pop up an empty graphics window. Answer the questions and then click in the window to exit the program.
Next, you will make the changes specified in TODO Steps 2–7. Here is a pictorial overview of these steps:
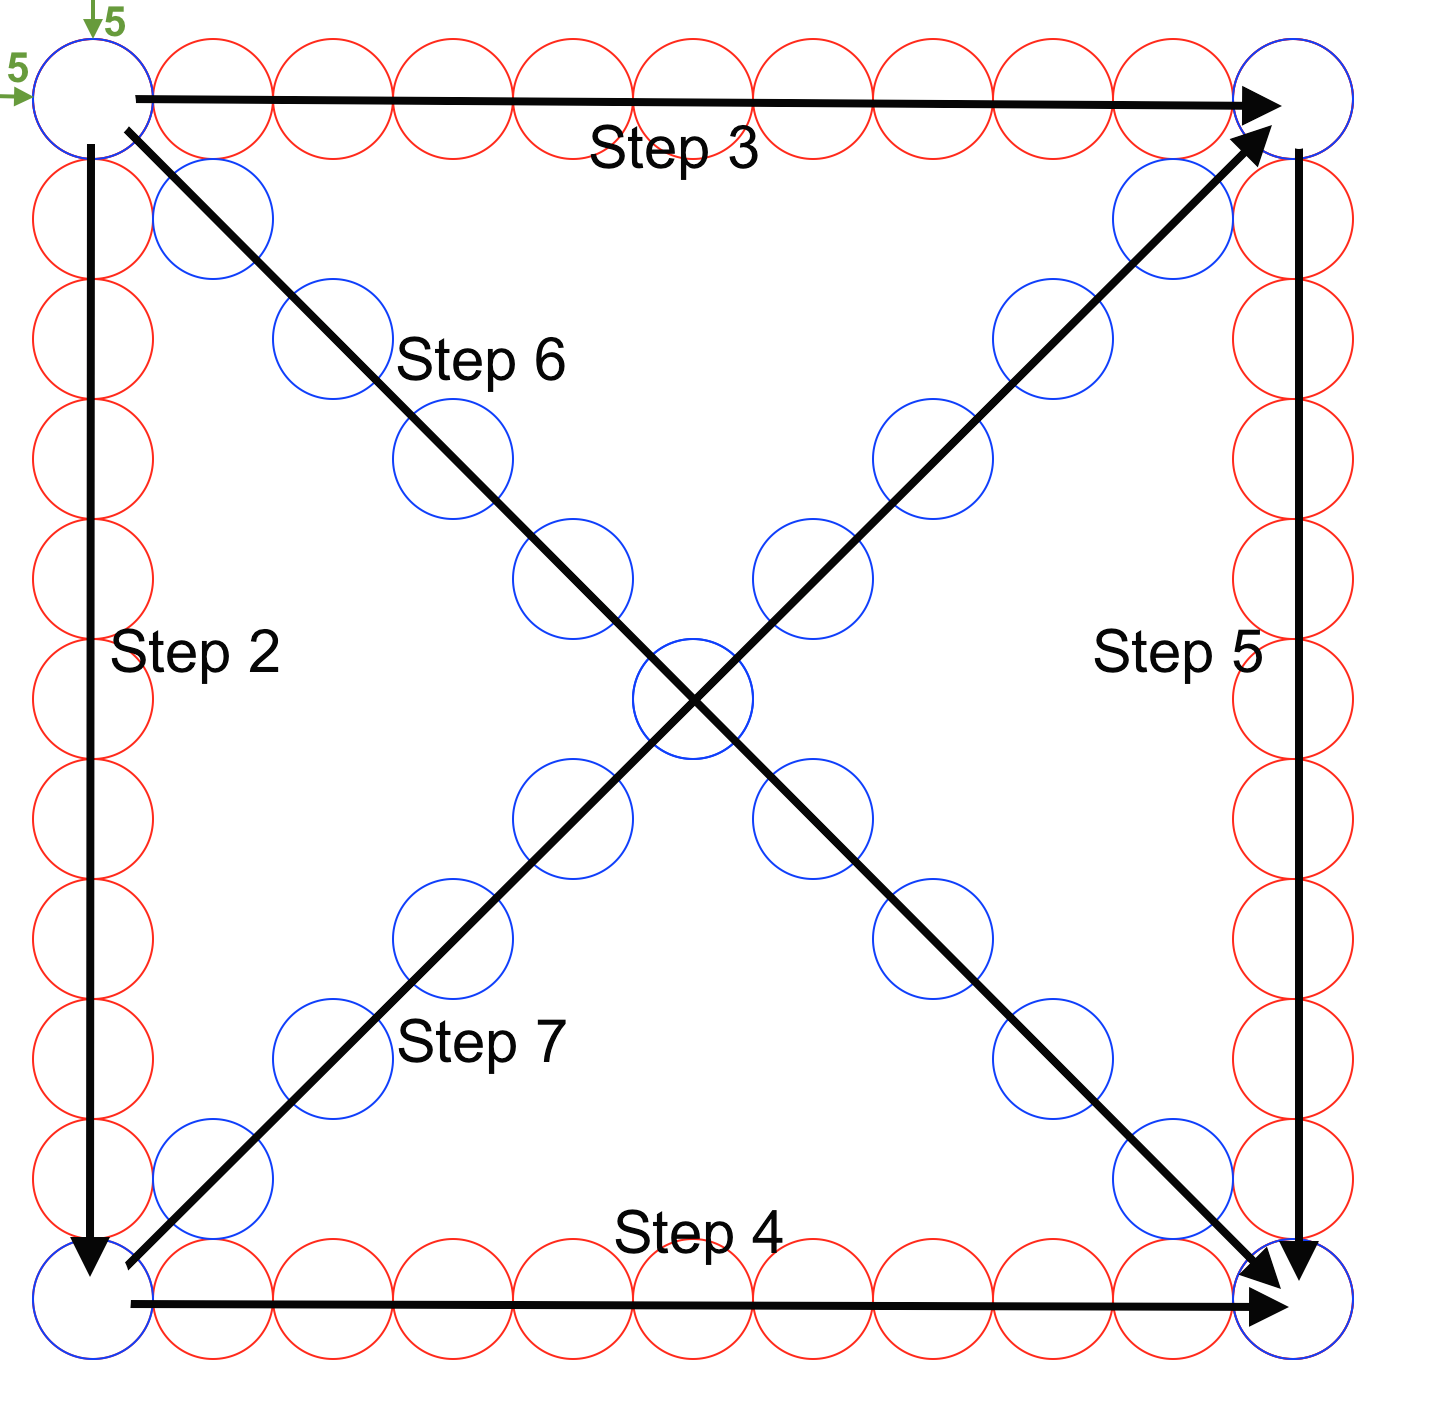
Although you could do this in a few different ways, your code will be easier to manage if you write a separate for-loop for each step. The rest of these instructions will walk you through each of these TODO steps. After you complete each step, run your code to be sure it works (don't try to work on multiple steps at once). To make your life easier, use a special circle color for the step you are working on, to make those circles easier to see.
- Directly after the TODO Step 2 comments, draw a stack of circles down the left edge of the graphics window based on the user's input. Choose initial values for x and y so that the top circle is 5 pixels away from the top and left edges of the window. You should be able to reuse some code from Part D.
- Directly after the TODO Step 3 comments (that is, below all of your copy-pasted code from Step 2, and outside of its for-loop), draw a row of horizontal circles across the top, 5 pixels away from the top of the screen. You can start by making a copy of the code you used in Step 2 and figuring out what to modify. It is OK if you draw a circle on top of the existing, top-left circle.
- Directly after the TODO Step 4 comments, draw a row of circles across the bottom. The leftmost circle in this row should line up with the bottom-left circle you drew in Step 2. Once again, it's OK to draw a circle on top of the existing bottom-left circle.
- Directly after the TODO Step 5 comments, draw a row of circles down the right edge. The top circle in this column should line up with the top-right circle you drew in Step 3.
- Directly under the TODO Step 6 comments, draw the left-to-right diagonal. Notice that you will have to change both the x and y coordinates each time you go through the loop. Unlike the horizontal and vertical circles, the diagonal circles won't necessarily touch at their edges. That is OK, as long as they are equally spaced.
- Finally, after the TODO Step 7 comments, draw the right-to-left diagonal directly.
- Make sure the horizontal and vertical circles are red and the diagonal circles are blue, just like in the picture above.
Test your code with several different numbers of circles and radii. If the user enters an even number of circles, the center of the square will look a little bit different, and that's OK. Here is an example with radius 50 and 10 circles per side:
If you can match these examples, adjust the window size to (900, 900) and re-try these examples and check the pictures are still drawn correctly. When you are done testing your code, adjust the window size back to (800, 800) and go to the next step.
- Demo. Call an instructor to demo your Part E code.
- Make sure that your name is in the docstring and that the docstring accurately describes what your program does.
- Continue to the next part.
Assignment Submission
Instructions
- Answer the last question in your Moodle writeup. Review your answers, and then click the "Next" button at the bottom of the quiz. Once you do that, you should see a "Summary of Attempt" screen.
Click the "Submit all and finish" button. Warning: You must hit "Submit all and finish" so that your writeup can be graded! It is not submitted until you do this. Once you have submitted your quiz, you should see something similar to this at the top of your Moodle window. The important part is that the State shows up as Finished.
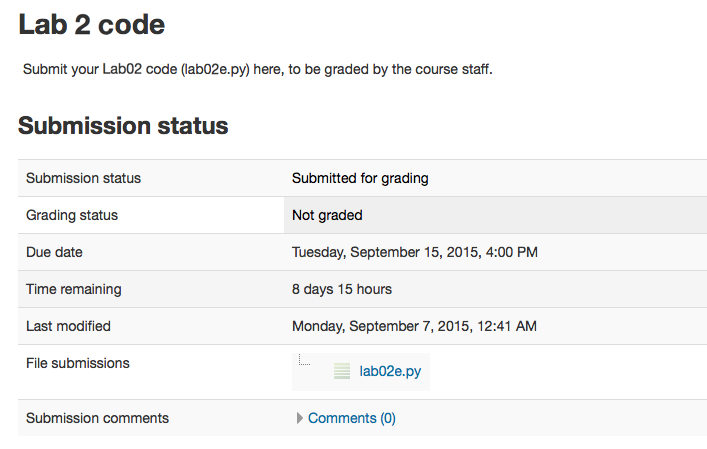
Please leave this tab open in your browser.Click on the "Lab 2 code" link in Moodle and open in a new tab. Follow the instructions to upload your source code (lab02e.py) for Lab02. You could either browse for your code or, using a finder window, drag and drop your lab02e.py from your cs115/Lab02 folder to Moodle. You should subsequently see a dialog box which indicates 'Submission Status' as 'Submitted for grading'.
- With these confirmation pages open in your browser, you may call an instructor over to verify that you have completed every part of the lab. Otherwise, you are done!