Lab 5: Programming Lab 2: Web Page Creation and Group Skills
There are 5 parts to this lab:
Part 1: Boot computer into MacOS, run Ubuntu
virtually, open lab directions, create folder, download and look
over grade sheet, and set up desktop.
Part 2: Create HTML document and load as web
page.
Part 3: Group work / extra credit / feel like a
programmer.
Part 4: Printout HTML document, fill out grade
sheet, and printout grade sheet.
Part 5: Check that all tasks are complete, email
assignment to instructor and self, shut down computer, and turn
in grade sheet.
Prior to lab discussion topics:
What is, and how do you
make, a web page?
Group skills discussion
Lab Directions:
Part 1: Boot computer into MacOS, run
Ubuntu virtually, open lab directions, create folder, download
and look over grade sheet, and setup screen.
When you first start your computer it will be running the MacOS
operating system.
For our project we will be using the Ubuntu operating system
running in a virtualization environment called VMware Fusion.
In a moment we will be starting the VMware Fusion software.
Once VMware Fusion starts your screen will look like this:
To start VMFusionware running double-click on the Mac desktop icon
titled  shown below:
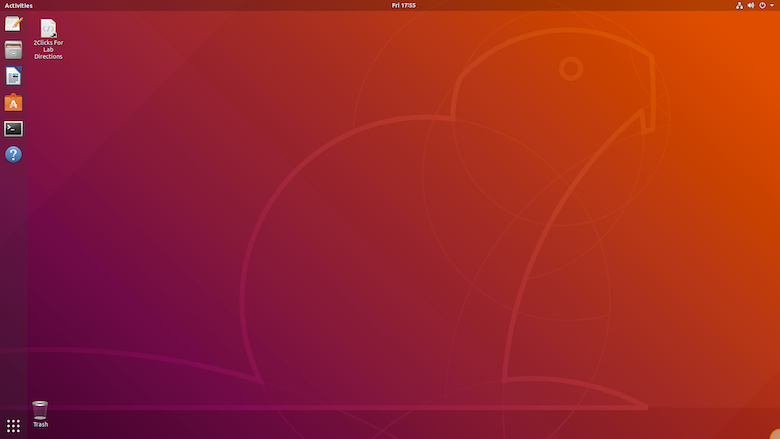
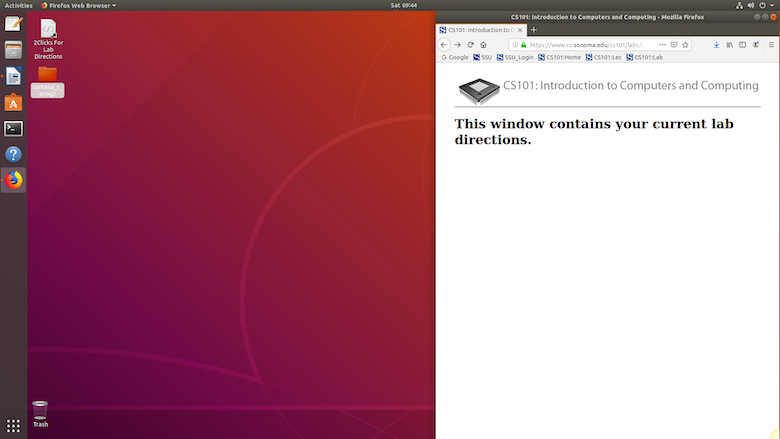
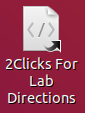
Once your computer is running Ubuntu double-click on the icon
called 2Clicks For Lab Directions on the
desktop as shown below to open up the Firefox web browser so
you can get to today's lab directions:
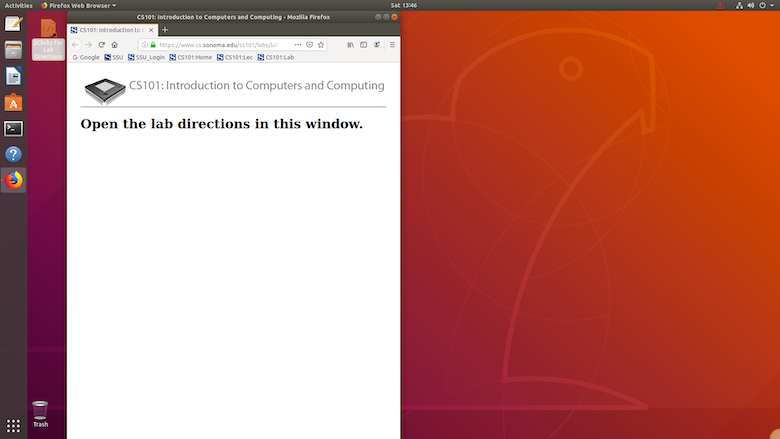
When Firefox opens click on the
link for today's lab directions. Your screen should look
similar to the one below:
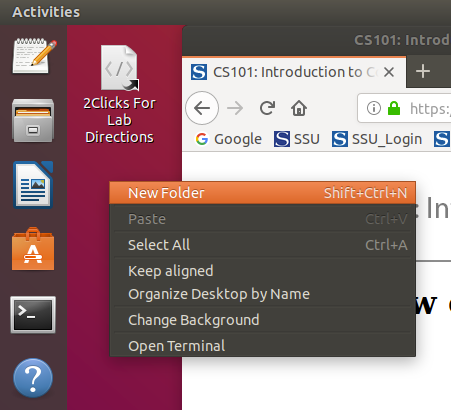
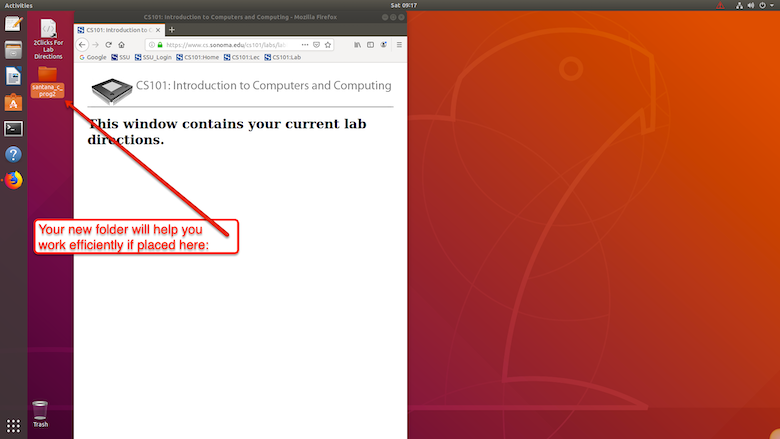
We will be creating a lot of files during today's project. We
will now create a folder on the Desktop to save the files into.
Right click on the Desktop and select New Folder
as shown below:
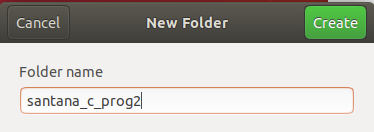
When the new folder appears use the following naming structure...
lastname_firstinitial_prog2
(i.e. Carlos Santana would call his folder santana_c_prog2)
... as shown below:
If needed drag the new folder to the following location to make it
easy to access later in lab with other programs open as shown
below:
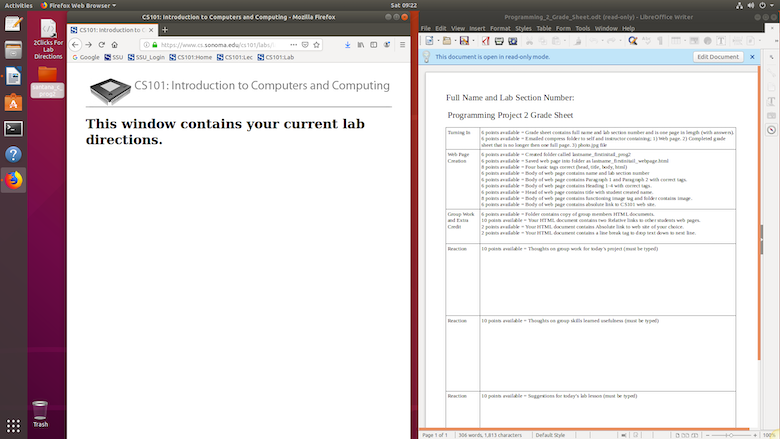
You are about to download and open the Programming
Project 2 Grade Sheet file using LibreOffice. When it
opens your screen will look like the one shown below:
To download today's grade sheet click on the following link:
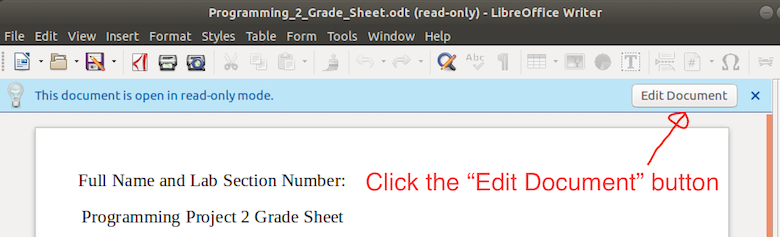
Now click the Edit
Document button as shown below:
Look over the grade sheet to
familiarize yourself with today's requirements. If you have any
questions ask your lab instructor. Later we will need to add to
the grade sheet and print it out. For those reasons we will now
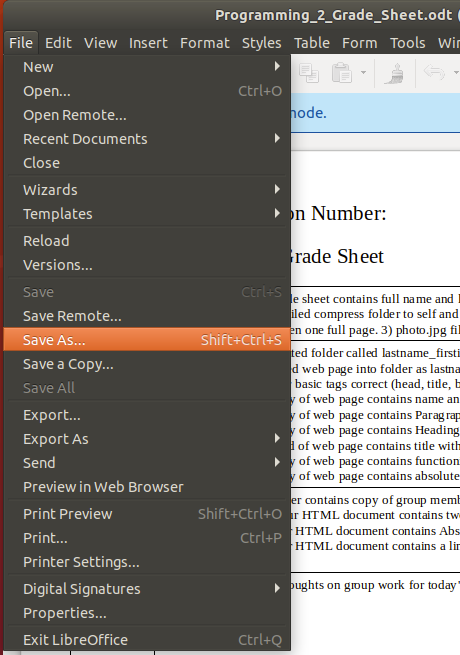
save the grade sheet into our new folder.
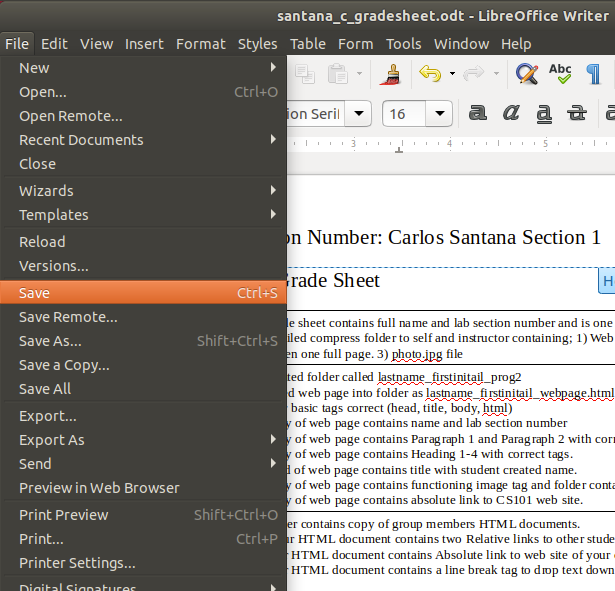
Select File menu > Save As...
as shown below:
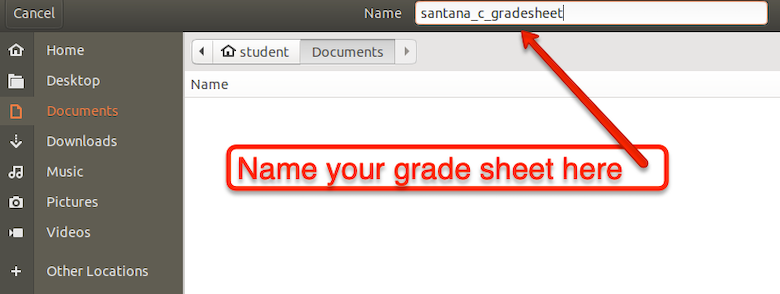
Now name your grade sheet the following by typing using the
following format ...
lastname_firstinitial_gradesheet
(i.e. Carlos Santana would call his folder
santana_c_gradesheet)
... as shown below:
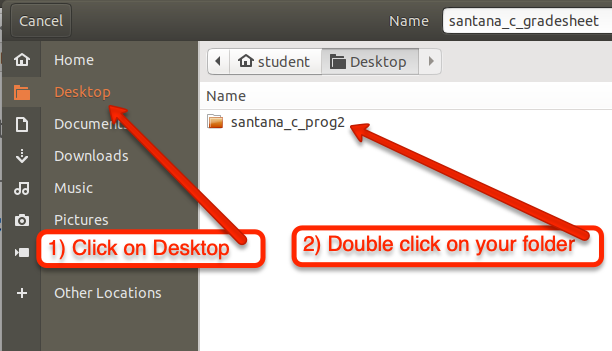
To save the grade sheet in your
folder click once on Desktop and then double
click on your folder as shown below:
If your Save dialog box looks similar to the one below...
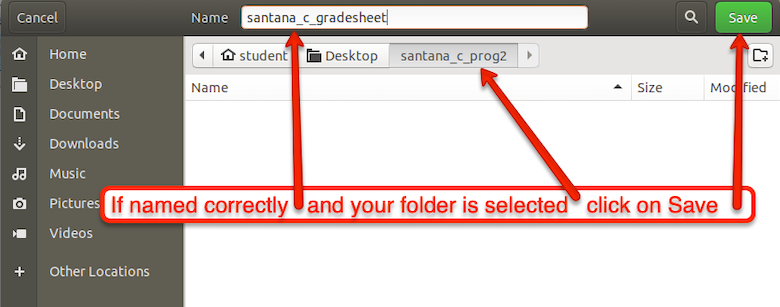
... then click on Save
button.
For this lab, and each of the
remaining programming labs, there will be a grade sheet. The
grade sheet informs you of the tasks you are required to
complete in that day's lab and how many points each of the tasks
are worth towards the total points available for today's lab
project. Look over the grade sheet to see how you will be
graded today. You can refer to the grade sheet as you work
through the project.
When you are done looking over the
grade sheet click on the Minimize button in the upper right
corner of the grade sheet...
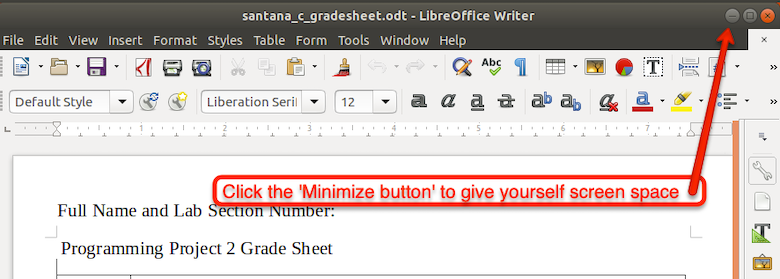
... to create desktop space for
today's project.
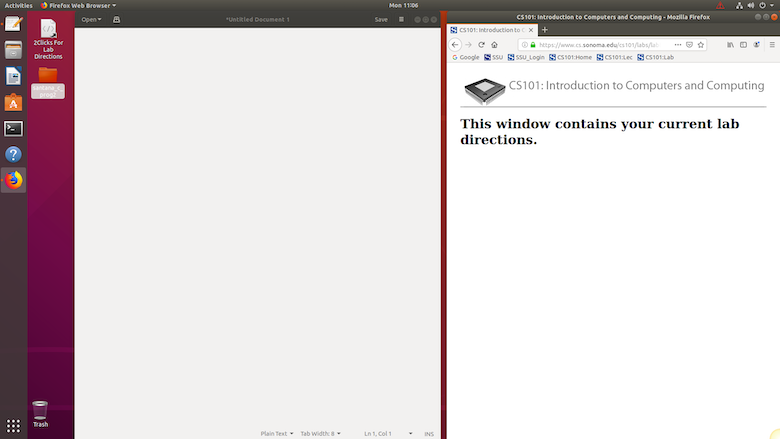
For today's lab it will be helpful
to have the directions on the other side of the screen. Drag
the directions to other side of the screen as shown below:
 Part 2: Create HTML document and load as
web page.
In today's lab we are going to learn how to make a web page that
contains multimedia elements.
First, what is a web page?
In its most simple form a web page is a HTML document.
What is HTML?
HTML is the standard markup language for creating web pages.
- HTML stands for Hyper Text Markup Language
- HTML describes the structure of a Web page
- HTML consists of a series of elements
- HTML elements tell the browser how to display the content
- HTML elements are represented by tags
- HTML tags label pieces of content such as "heading", "body",
"title", and so on
- Browsers do not display the HTML tags, but use them to
render the content of the page
- The purpose of a web browser (Chrome, Edge, Firefox, Safari)
is to read HTML documents and display them.
How can I create a HTML document (web page)?
One way is to create a web page by hand in a text editor, this is
perhaps the best way to learn when new to creating web pages. On
the Ubuntu launcher click the Text Editor icon
as shown below:

Once the editor opens set up your screen like the one below:
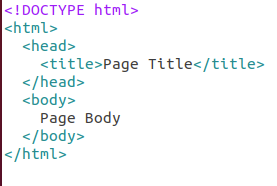
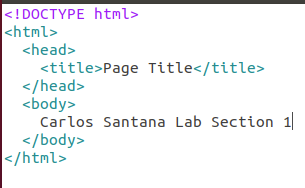
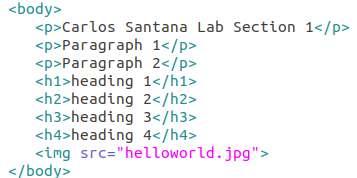
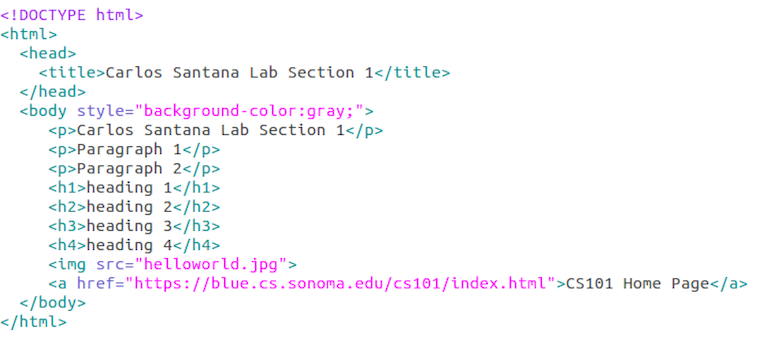
Type the following information into the text document:
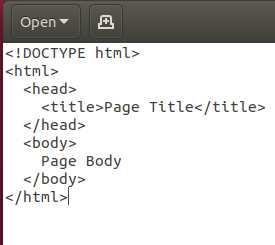
Above document explained:
The <!DOCTYPE html> declaration defines
this document to be HTML5 (the fifth version of HTML).
HTML tags normally come in pairs like <head> and
</head>
The first tag in a pair is the start tag, the second tag is the
end tag
The difference between a start tag like <head>, and an end
tag like </head>, is the end tag has a /.
The <html> tag starts an HTML page. </html> ends a
HTML page.
How do we display our web page in a web browser?
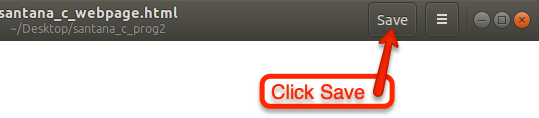
First, we need to save our HTML document.
In the Text Editor select the Save button as
shown below:

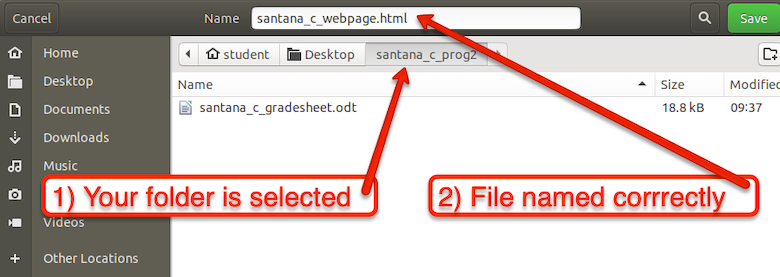
When the save dialog box opens type in the following name format
in the Name box...
lastname_firstinitial_webpage.html
(i.e. Carlos Santana would call his folder santana_c_webpage.html)
... as shown below:
Super important to have the .html (it is a file extention) on the
end of your name!

Next, in the save dialog box click on the Desktop
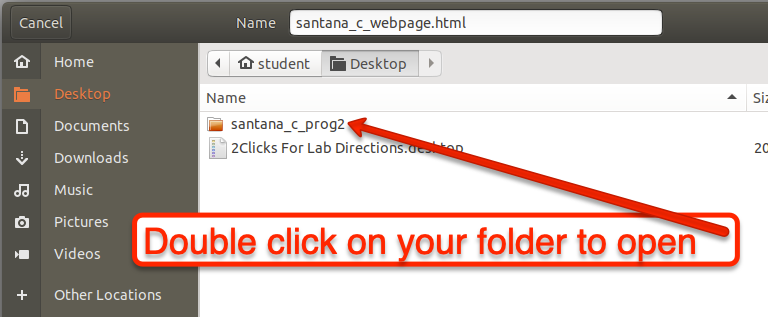
and then double click on your folder as shown below:
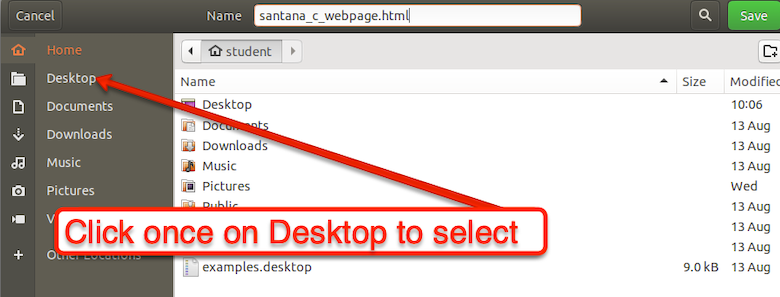
Double click on your folder to open it as shown below:
Now if your Save dialog box is setup like the one below...
... then click the Save button as shown below:

Notice that once we saved the document the text in it became
different colors. That is the text editor realizing that you
saved a HTML document and it is trying to help you edit it by
making the tags and plain text different colors as shown below:
Now locate your folder on the Desktop and open it by double
clicking to locate your HTML document in your folder as shown
below...
... (your HTML document will open in a new tab in Firefox just
click on the tab containing today's lab directions to return to
here) and then double click your HTML document to load into the
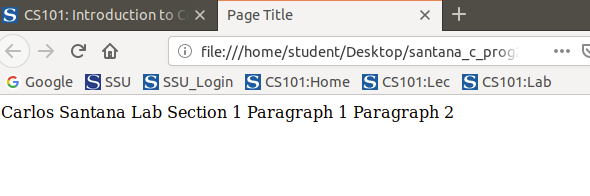
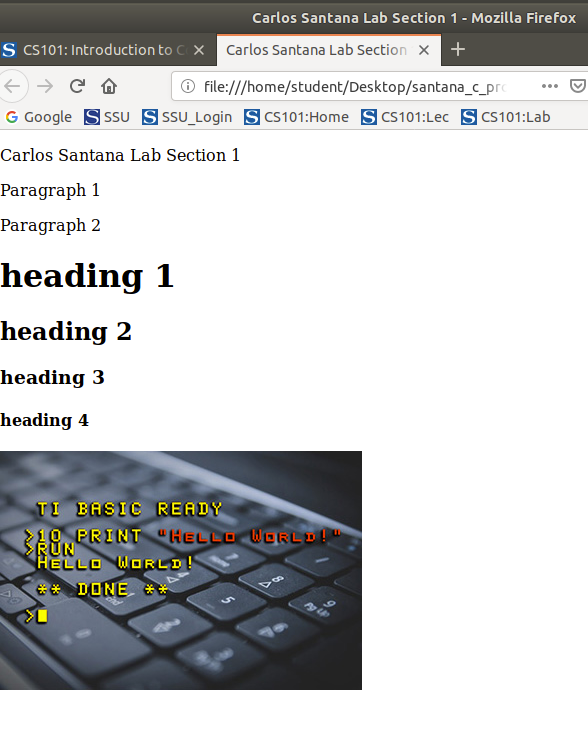
Firefox web browser and notice were the title and body text from
your HTML document are displayed as shown below

Close your folder window.
The <head> tags define the head area of an HTML document.
The <title> tags specifies a title for the document. The
title is listed in the Title bar of the window and is also what a
bookmark will be called if set by the user.
The <body> tags define the body area of an HTML document.
The body contains the visible page content.
Congratulations! You are now a web developer. You have made and
displayed the most basic web page.
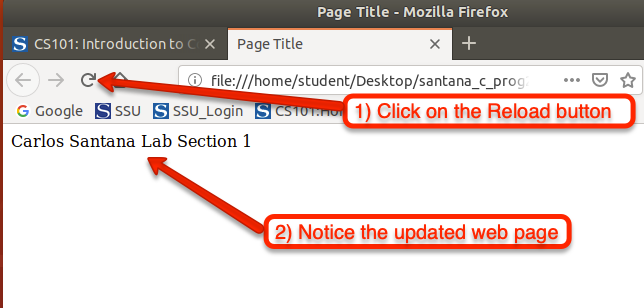
How do we add to the web page?
We add to our HTML document, save the changes, and reload our web
page in the browser.
How do we add more text?
Change the text, Page Body...
... to, your name and lab section number as shown below:
On the top of your Text Editor window click the Save
button to save the changes to your HTML document as shown below:
Now in your web browser tab containing your web page click on the
reload button as shown below:
Anything that goes between the opening <body> tag and the
close </body> tag will show up on the main area of the web
page.
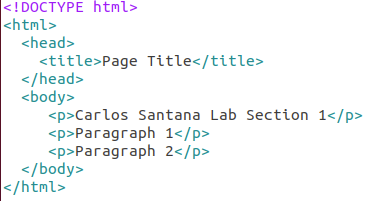
Type the following text into your HTML document:
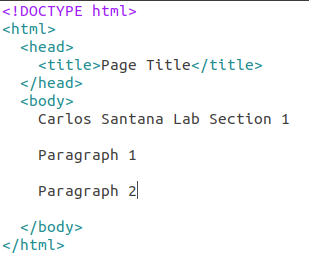
Save your HTML document and reload your web page. Notice how even
though we put blank lines in your HTML document between the
paragraphs the text all runs together in the web browser as shown
below:
That is because the web browser ignores formatting in the text
editor and only responses to HTML tags.
How do we format the text on our web page?
To separate our paragraphs we will need to use a paragraph tag.
Edit your HTML document to look like the one below:
Save your HTML and reload in web browser to see the effects of a
paragraph tag as shown below:
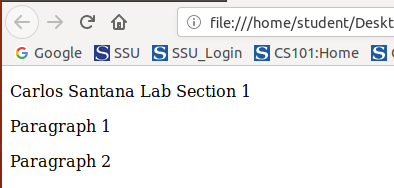
The paragraph tag puts a blank line before and after the text it
surrounds.
How do we make text bigger?
Heading tags are one way to make text bigger. Add the following
header tags and text to your HTML document:
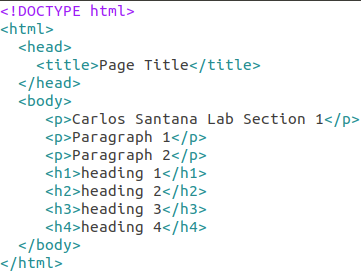
Save your HTML and reload in web browser to see the effects of a
heading tags as shown below:
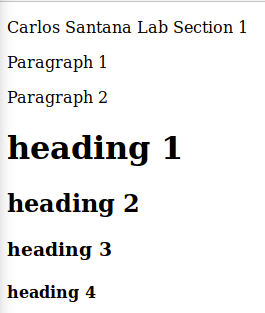
Notice how the heading tags change the size of the text, make it
bold, and place a blank line in front and after the text they
enclose.
Notice that everything we have done is between the body tags and
showing up in the main part of the web page.
How do I change the title on my
web page?
Up to now we have been working between the <body> tags on
our web page. As you may have noticed, everything you do
between the body tags shows up on the main window of a web
browser.
We are now going to edit our title of our web page. The body
is one main area of a HTML document. The other main area is the
head. Notice that between the opening <head> tag and the
closing </head> tag are the title tags.
Change the text between the <title> tags to your name and
lab section number as shown below:

Save your HTML document and reload in the browser to display your
name and lab section now as the title of the web page as shown
below:
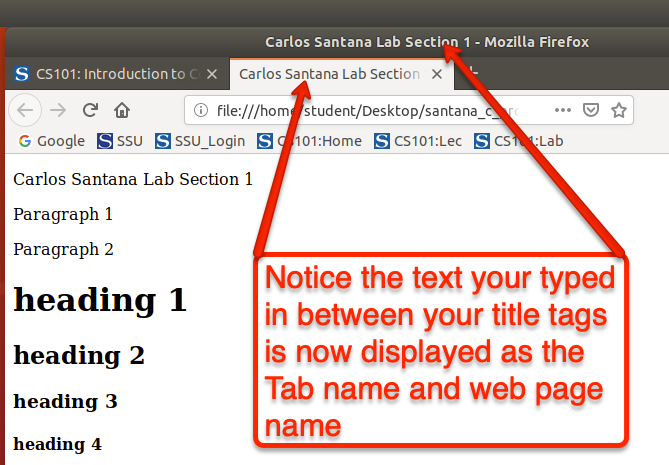
Your name and lab section number are now the title of the tab your
web page occupies and the title of the web page window. If
someone sets a bookmark for your web page it will also be the
default name of the bookmark.
How do I add and image to my web page?
To add an image (photo) to our web page we need an image. We
are now going to download an image file into your folder on the
Desktop. In order to still be able to see these directions
while you download the image, you will need to open the image in
another window. You will need to right-click on the following
link and select Open Link in New Window...
as shown below:
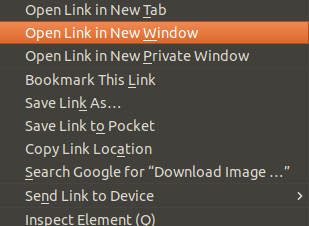
Right-Click this
link and select Open Link in New Window...
The image will appear in another window as shown below:
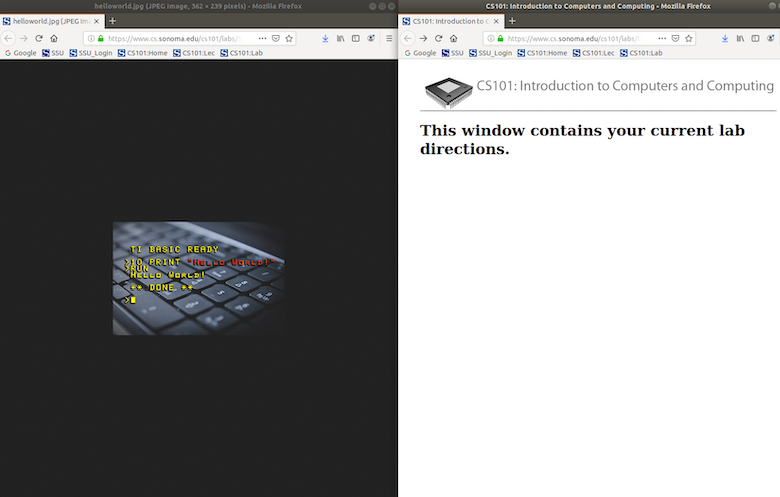
Right-click on the image and select Save Image As...
as shown below:
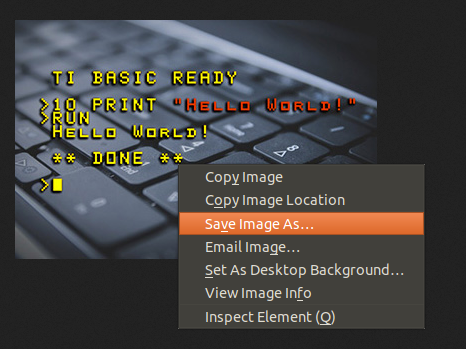
When the Save dialog box opens double click on your folder to
select it as shown below:
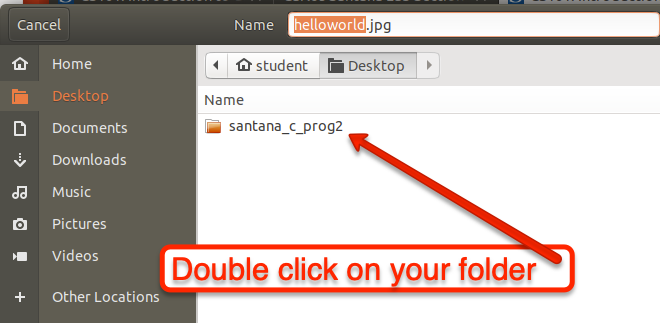
If your Save dialog box looks similar to the one below...
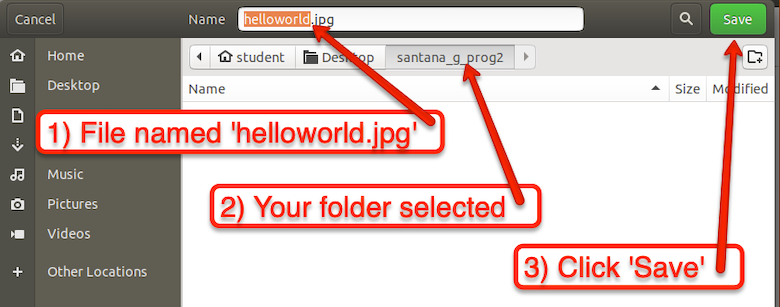
... click on the Save button.
Close the browser window containing the image.
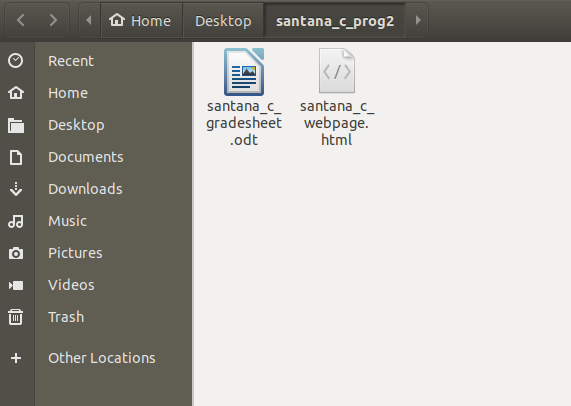
If you now double click on your folder on the Desktop you should
see the following new file...
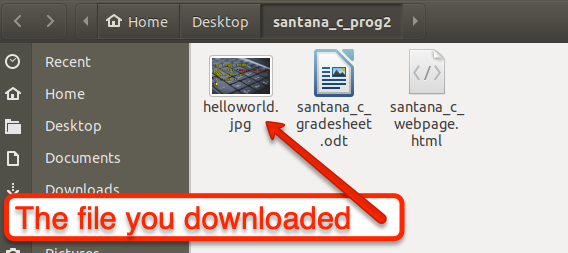
Close your folder window.
To load the image onto your web page you DO NOT place the image in
your HTML document. Instead, you put in a HTML tag to tell the
web browser to go download the image file and place it on the web
page at the spot your placed the tag.
We will now add the image tag to our HTML document. Add the
following tag to the body of your HTML document:
Save your HTML document and reload your web page. Your web page
should now display the image as shown below:
You just placed in image source tag in your HTML document.

This is how it works. The img src part of the
tag tells the browser it must go find an image file and download
it. The helloworld.jpg tells the web browser
which file to download. The web browser can find the file because
it is in the same folder as your HTML page. This is a relative
link. Relative to your HTML document the image file is in the
same folder.
How do I link to another web page?
You link to other web pages by placing a hyperlink into your HTML
document.
So far you have been making a stand-alone web page, but what makes
the Internet so special is that it all linked together.
The “H” and “T” in “HTML” stand for “hypertext”. Hypertext
basically means there is text on a web page that you click on to
link to somewhere else.
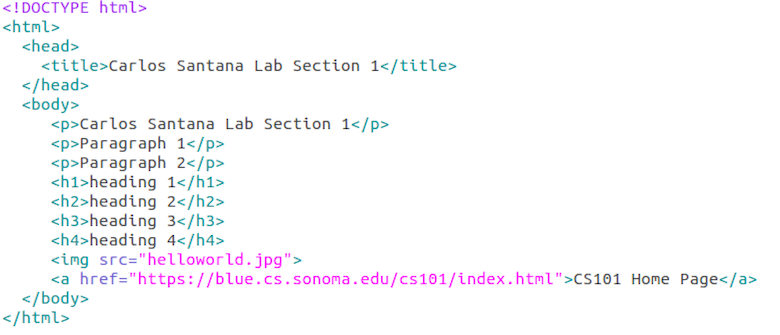
An anchor hard reference tag <a href> </a> is used to
create a link. It has the following form:
<a href="The web address you want to link to goes
here">The text you want the user to click on to go to that
web address goes here </a>
Add the following tag to your web page:
Save your web page and reload in browser to have the link show up
as shown below:
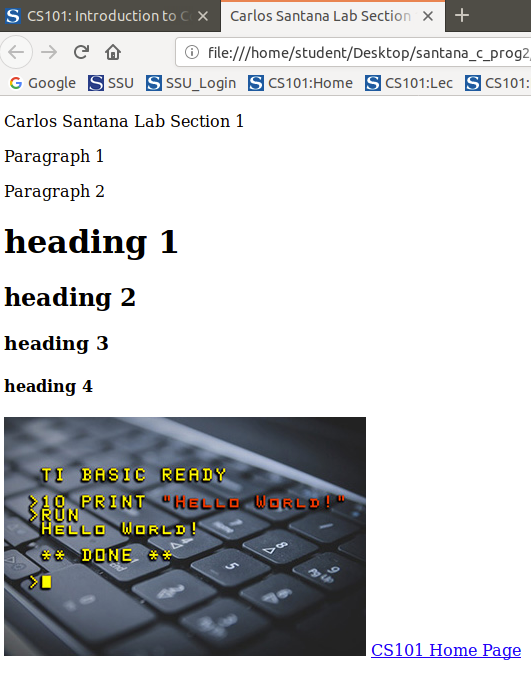
Try out the link by clicking on it in the web browser.
You just created an absolute link. When the user clicks your link
they go to the web page located at the address
"https://www.cs.sonoma.edu/cs101/". That address points to one
computer and one HTML document on the Internet. If that HTML
document is not on that computer the address will not work. The
HTML document absolutely needs to be on that computer.
How do I change the background color of my web page?
To change the background color of a web page your can add a style
element. A style element is used to define style information for
an HTML document. We will learn about styles in our next lab when
we learn about Cascading Style Sheets (CSS).
We will change our background color by add a style element to the
opening body tag.
Change your opening body tag as shown below:
We just added a style to our opening body tag. Save and reload
your web page to see if the color changed as shown below:
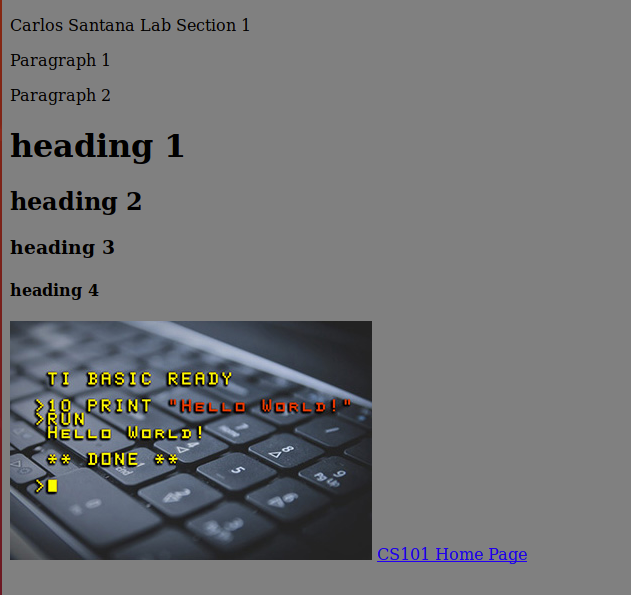
You can try other colors if you want (I would avoid Blue because
links are blue and I would avoid black because text is black).
Part 3: Group work / extra credit / feel
like a programmer
We will now enter the group portion of today's lab. For each
group:
- Create another absolute link to a web site of your choice.
- Place a line break tag in the HTML document so that link to
the CS101 web site appears below the image instead of to the
right of the image and there is no blank line between the
image and the link when you are done.
- Save a copy of two other group member's HTML documents into
your folder on your computer.
- In your own HTML document, below the link you have already
created, create a relative link between your
web page and your other two group member's web pages that are
now in your folder.
Part 4: Print out HTML document, fill
out grade sheet, and printout grade sheet.
When you are done with the extra credit you will need to print out
a copy of your HTML document, complete the grade sheet, and print
out a copy of the grade sheet to turn in.
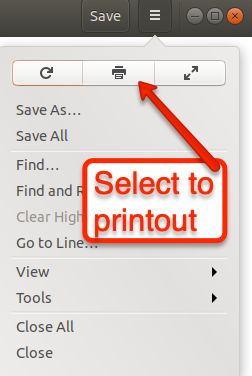
Before you print out your HTML document click the Save
button  to save your most recent changes.
Then select from the menu the print icon as shown below:
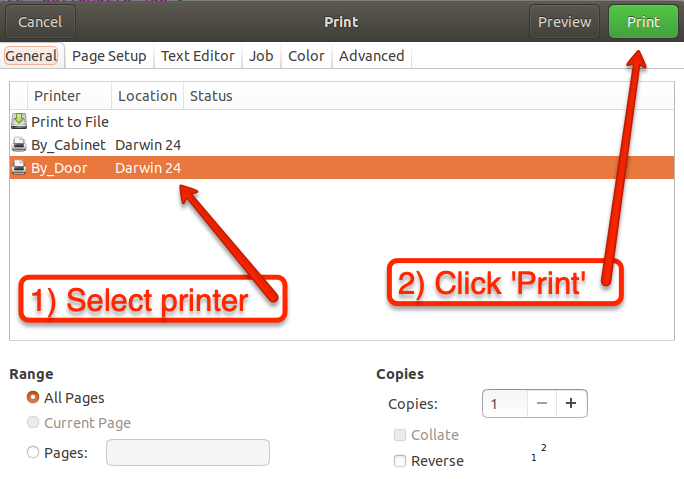
When the Print dialog box shows up select the printer you want to
use and click the Print button as shown below:
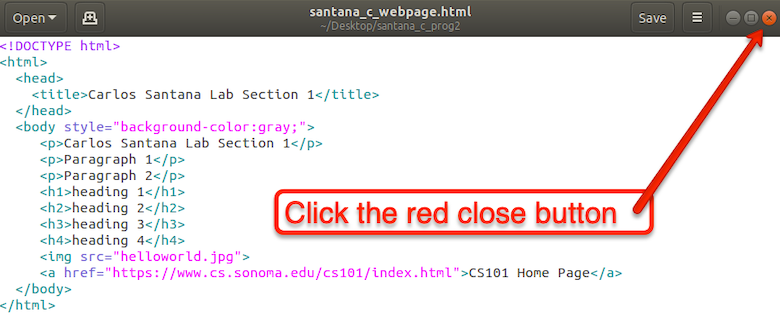
Once you have retrieved your printout of your HTML document close
the document by clicking the red button in the upper right corner
of the window as shown below:
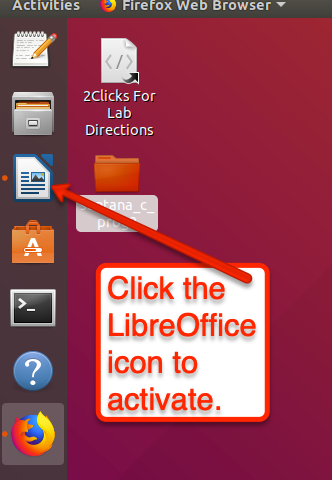
We now need to fill out and print out the grade sheet. On the
Ubuntu launcher click on the LibreOffice icon to bring the Grade
Sheet back to full window status as shown below:
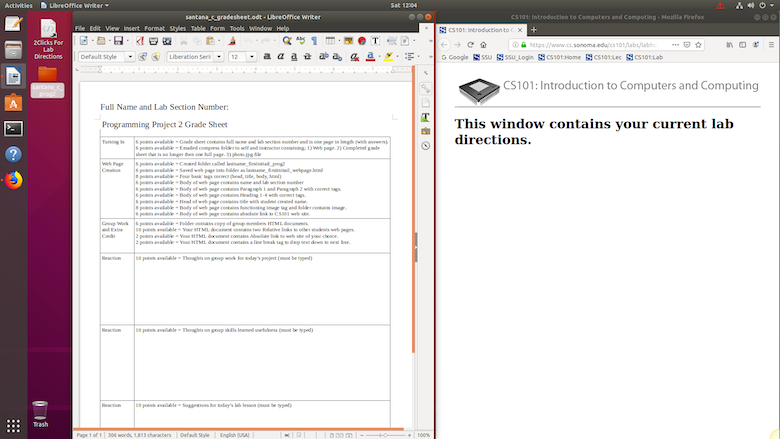
Drag the document to the left side of your screen to setup your
Desktop as shown below:
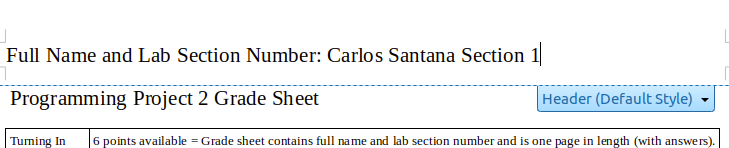
Now in the header of the document type your name and lab section
number as shown below:
Now answer the three reaction
questions on the grade sheet by typing in your answers and
making sure to stay only one page in length.
Once you have completed your grade sheet you will need to save it
by selecting File menu > Save
shown below:
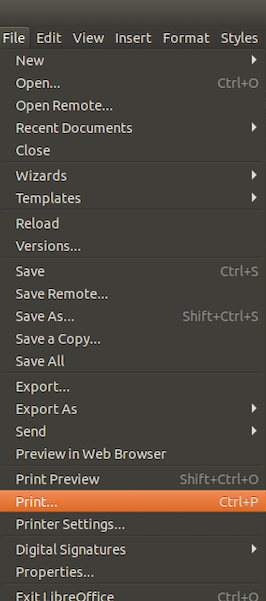
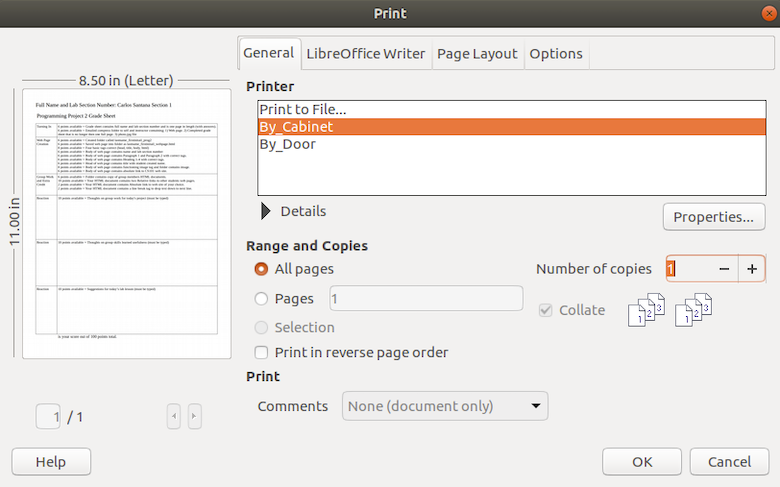
To print out a copy of your grade sheet select File
menu > Print as shown below...
... to open the following dialog box,
Select either the By_Cabinet or the By_Door
printer and then click on the OK button.
Now walk up to the printer you selected and retrieve your print
out of the grade sheet.
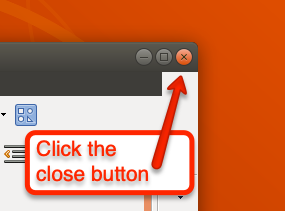
Close the grade sheet by clicking the red close window button in
the upper right corner of the window as shown below...
If the Save dialog box appears...
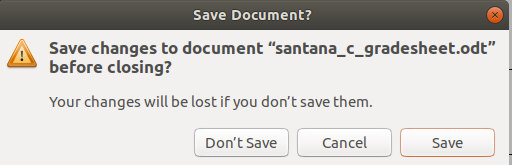
... click on Save.
Your screen should now look like this:
Look over grade sheet printout to complete the requirements for
today's lab. If you have any questions about the grading ask your
instructor.
Part 5: Check that all tasks are complete,
email assignment to instructor and self, shut down computer, and
turn in grade sheet.
Your desktop should now look like this:

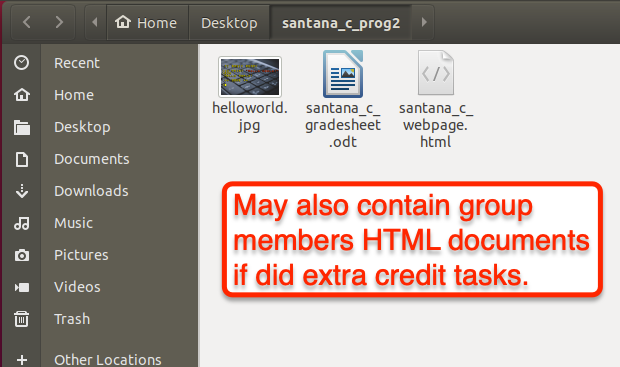
Make sure the following 3 items are in your folder on the
Desktop by double clicking on the folder and opening the
following window (plus your group
members HTML documents if you did the Extra Credit):
Close the open window containing the three items.
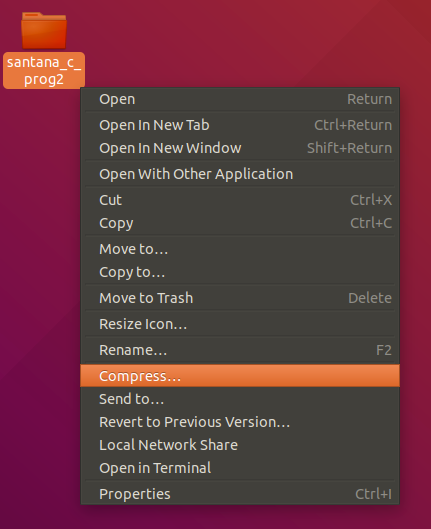
Next we will compress a copy of your folder so that we can
email it to both yourself as a backup and to your instructor for
grading. Right click on our folder and select Compress...
as shown below:
Make sure that the dialog box that appears is set up like the
one shown below...

... and then click on Create.
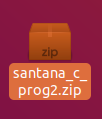
A compressed version of your folder and files will show up on
the desktop as shown below:
Follow the steps below to send the new compressed folder to
yourself and your instructor:
Step 1) Click the following link to open the SSU login page in
a new tab, to login to your online SSU
email account (or other online email account).
Step 2) Create a new email.
Step 3) Fill in the subject for the email as:
lastname_firstinitial_prog2
(example: santana_c_prog2)
Step 4) Attach the compressed folder to the new email.
Step 5) Address the email to your instructor's email address
(highlight and copy the email address for your instructor from
the list below):
Mr. Carter's lab section's use this email
address = glenn.carter@sonoma.edu
Step 6) CC the email to yourself.
Step 7) Send the email.
Once you have emailed in your assignment make sure you staple
the grade sheet onto the top of your HTML document and turn them
in to your instructor.
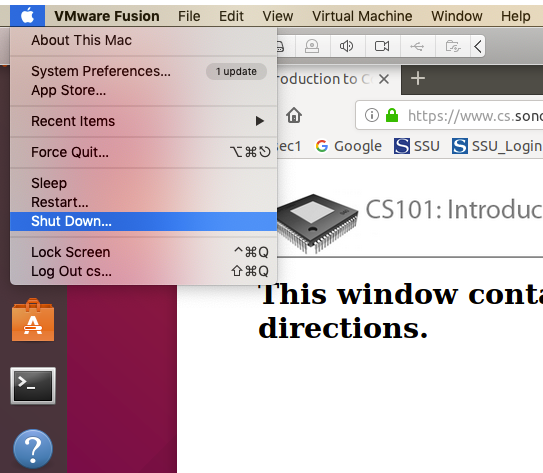
Lastly, to exit out of Ubuntu running in VMware Fusion and shut
down the computer place your mouse at the top of the screen and
wait until the VMware Fusion menus appears and then select Apple
menu > Shut Down... as shown below...
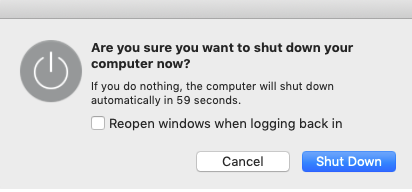
... and when the following dialog box appears select Shut
Down as shown below:
End of Lab. |
