"""
Program: CS 115 Lab 3b
Author: Your name
Description: Using the graphics package, this program will draw a circle.
"""
from graphics import *


def main():
    window = GraphWin("Circles", 800, 800)

    center = Point(100, 200)         # create a point to serve as the center of the circle
    radius = 40
    circle = Circle(center, radius)  # create a circle centered at "center" with radius "radius"
    circle.setOutline('blue')
    circle.draw(window)              # draw the circle in the window that we created earlier

    window.getMouse()                # wait for the mouse to be clicked in the window
    window.close()                   # close the window after the mouse is clicked in the window


main()
A few notes about this code...
The statement
window = GraphWin("Circles", 800, 800)
creates a window called window whose title is Circles and whose width and height are 800 pixels each (the first number is the width and the second one is the height).
To create a circle, we need to first create a Point to position its center. The variable center serves this purpose. Notice that the data types of graphics objects begin with upper-case letters, and we are using lowercase letters for the names of specific objects.
We also made the radius a variable, so that we can easily change it later if necessary. But our code:
center = Point(100, 200)
radius = 40
circle = Circle(center, radius)  # create a circle centered at "center" with radius "radius"
is equivalent to:
circle = Circle(Point(100, 200), 40) # create a circle centered at (100, 200) with radius 40
For now, either option is fine.
After we create and configure our circle, we use the following statement to draw it into the window that we created earlier:
circle.draw(window) # draw the circle in the "window" that we created earlier
Without that statement, the circle will not appear in the window.
Before our program finishes, we need to close the window that we have created. We use the following statement for that purpose.
window.close() # close the window after the mouse is clicked in the window.
However, if we put this right after the circle.draw(win), our program will draw the circle and then immediately close the window, before you get a chance to see what has been drawn in it. To prevent that, we add the following statement:
window.getMouse()   # wait for the mouse to be clicked in the window
window.close()   # close the window after the mouse is clicked in the window
The statement window.getMouse() forces the program to wait for the user to click the mouse in the window before it proceeds. With this statement, we can make sure that the objects that we intended to draw appear in the window before it closes.
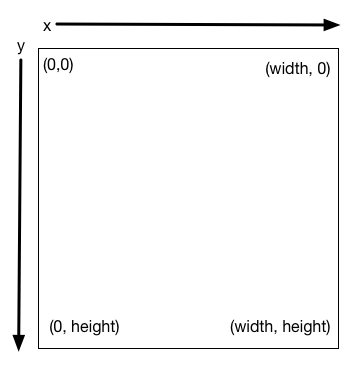
Answer Question 13 in Moodle. Remember that the graphics coordinates work like this: